App Tutorial - OHIP (WINDOWS CLIENT)
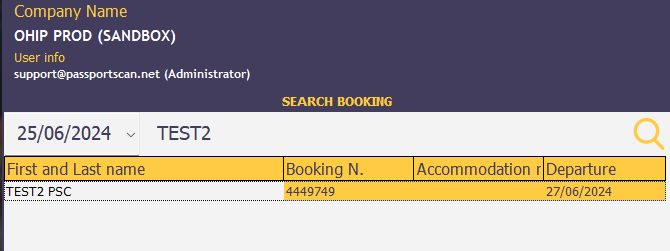
When we have an active integration with Opera Cloud, the process begins with searching for a reservation. This search is conducted against the PMS database, so to perform a "Walk-In," the reservation must be created in Opera first and then searched for.
"Search Booking" is the field where you enter the search parameter. You can use the guest's first name, last name, room number, or, alternatively, the reservation's confirmation number, the latter being the most precise but less "user-friendly."
"Date selection" allows the operator to specify the search date; only past dates or the current date are permitted.
After filling in the search bar, the operator must press the magnifying glass to initiate the search.
Clicking on the found reservation will grant access to it:

Guest List:
Profiles imported from Opera will be directly visible in the application. As with non-integrated systems, a guest can be added or an existing guest replaced via the button with the scanner icon.
Scanner Icon: This button allows the scanning and recognition of document data. It provides three options:
- "Add" to add an additional guest to the reservation.
- "Replace" to replace the existing profile data.
- "Cancel" to cancel the scan order.
Scan Results:
Each profile's information will display a summary of the profile data. For an Opera profile that was empty, it will show the information already in Opera and allow us to import it. Replacing this data via scanning will update the information directly in the Opera profile after saving the changes.
The right arrow icon serves a dual function: it closes the reservation and, once changes are confirmed, transfers this information to our workspace, where it will automatically replicate in Opera Cloud. Just a second later, the changes will be visible directly within the Opera reservation.
Related Articles
Local Passportscan - Windows Client Installation
WARNING: Use exactly the files we provided, using a newer version of ODBC or Visual C++ could create a malfunction into your Passportscan Client. Files needed: Mandatory Passportscan Classic (Windows Client) MySQL ODBC Connector (You might also need ...Resolución del Conflicto entre Windows 11 KB5046740 y Passportscan Client
Introducción Buenos días, hemos detectado un problema con la última actualización de Windows 11 (KB5046740), que causa un conflicto con el Windows Client de Passportscan. En este tutorial, te guiaremos a través de los pasos para: Desinstalar la ...Risoluzione del Conflitto tra Windows 11 KB5046740 e Passportscan Client
Introduzione Buongiorno, abbiamo rilevato un problema con l'ultimo aggiornamento di Windows 11 (KB5046740), che causa un conflitto con il Windows Client di Passportscan. In questo tutorial, ti guideremo attraverso i passaggi per: 1. Disinstallare ...Resolving the Conflict between Windows 11 KB5046740 and Passportscan Client
Introduction Good morning, we have detected an issue with the latest Windows 11 update (KB5046740), which causes a conflict with the Passportscan Windows Client. In this tutorial, we will guide you through the steps to: Uninstall the problematic ...App Tutorial - OHIP
Cuando tenemos una integración activa con Opera Cloud, el único botón disponible será "Search Booking". PassportScan Cloud buscará las reservas directamente desde la base de datos de Opera, por lo que para poder hacer el check-in de una reserva, esta ...